Intro
The Document Object Model (DOM) is how you manipulate HTML elements of a webpage using a language like Javascript. The DOM works by treating the webpage as a tree-like structure where every HTML tag is an object and gives you access to navigate, create, alter or delete the content of HTML elements, attributes, and CSS styles.
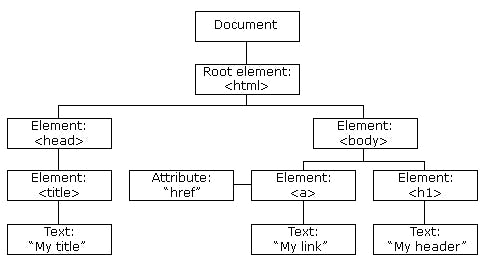
Here is a visual representation of the objects of a DOM tree from W3Schools:

In the representation above, the structure is a collection of nodes where they have a
root -> parent ->child -> sibling relationship. The <html> is the root where all other elements are descendants.
Traversing
Finding, selecting, or traversing elements are managed by creating a reference point to a specific node where you can then move downward, upward, and sideways.
Get Element By ID
The most common way is to select an id that is always unique and only returns a single element.
HTML snippet:
<h1 id="blog-title">Traverse the DOM like a PRO</h1>
Javascript snippet:
const blogTitle = document.getElementById("blog-title");
console.log(blogTitle.textContent);
// Traverse the DOM like a PRO
Get Elements by ClassName
This returns a collection of objects since more than one element can have the same class name.
HTML snippet:
...
  <li class="item">Item 1</li>
  <li class="item">Item 2</li>
  <li class="item">Item 3</li>
Javascript snippet:
const items = document.getElementsByClassName("item");
for (item of items) {
    console.log(item.textContent);
}
// Item 1
// Item 2
// Item 3
Note: getElementsByClassName does not behave like real arrays. It may not have methods like forEach, slice, some, map and must include Array.from(element) to turn into an array including those properties.
Query Selector
This is my favorite way and allows you to select either an id or the very first class of the specific class name. Defining the id or class name uses a similar syntax in which you would use in your CSS file.
Javascript snippet:
const blogTitle = document.querySelector("#blog-title");
const firstItem = document.querySelector(".item");
console.log(blogTitle.textContent);
console.log(firstItem.textContent);
// Traverse the DOM like a PRO
// Item 1
Query Selector All
If you need to modify more than one element of a particular selector, this is an alternative method and my preferred method.
Javascript snippet:
const items = document.querySelectorAll(".item");
items.forEach(function(element){
    console.log(element.textContent);
})
// Item 1
// Item 2
// Item 3
Selecting Children
Traversing down or selecting the children of a node can be accomplished by the children method.
const parent = document.querySelector(".parent");
const firstChild= parent.children;
Selecting the first child or last child is also possible by firstChild and lastChild methods respectively.
Selecting Parents
Traversing up or selecting the parents of a node can be accomplished by the parentElement method.
const firstChild = document.querySelector(".firstChild");
const parent = firstChild.parentElement;
One thing to note is that the parentElement method only allows you to move up one parent at a time. You can not skip a parent.
A way to resolve this is by using the closest method where we can find any specific parent element.
grandparent = child.closest(".grandparent")
Selecting Sibling Elements
If you would like to traverse a sibling of an element, you can use nextElementSibling to move forward to the next sibling.
const secondChild = firstChild.nextElementSibling;
If you want to move to a previous sibling and move backward, use previousElementSibling
const firstChild = secondChild.previousElementSibling
Conclusion
By describing multiple ways to traverse, you should now be comfortable selecting any element in a webpage. Although querySelector may be a simple way to find any element, some web pages may be extremely large and it may be better to use the sibling options instead to increase performance. Although we went over many options, there are countless more options available in traversing. To find more information, visit the MDN DOM Documentation.
